• Welcome to H4O! For a reduced ad experience, please login or register with the forum.

Portager's H3T Modifications

08SolarFlareH3

Super Swampers
Messages
2,525
Location
Finger Lakes, NY
After the first trip to Gold Mountain, I realized the E&G Fender Flares weren’t going to work for off-roading. Even though I only have 33" tires the wider 305 profile and 4.93" backspace combined with the KM2 tread pattern produced a lot of tire to flare rubbing at full articulation so I ditched the fender flares.

I also installed the Thor Parts rear bumper and spare gate to get the spare tire out from under the bed of the truck.

And here is a better view of the spare gate.

I was a little worried that the spare tire would run away, so I installed locking lug nuts that match the locks on the main wheels so they all use the same lug nut key.

Sorry about the photo, I'll get better picture from the side. Once I get a fifth wheel to match the other four, the locking lug nuts will be sunken and more secure. One of the spare tire mounting studs started spinning when I replaced the lug nuts, so I had the heads welded to the bracket. I'll try and take a picture of that also.

To prevent someone from taking the spare and the mounting bracket I installed a lock.

I got the new bumper and spare gate installed before the Bishop trip so I’ve wheeled it at Bishop and Gold Mountain. Overall, I'm very pleased with the bumper and spare gate. The bumper retains the original departure angle and getting the spare tire out from under the bed improves ground clearance. Also, now I can replace my "space saver" 285 spare with a full sized 305 tire. I also think the spare tire mount looks better when combined with the Slant Back topper because the spare looks less exposed. I need to take pictures of the spare gate open and the cargo slide extended. The gate does restrict access to the front passenger side of the cargo slide, but I can squeeze between the spare gate and cargo slide if I need to (although it could get messy if your off-roading in mud). I plan to move the CO2 PowerTank to the driver’s side and put stuff that I access less in the other corner. The only thing I would change or add would be a latch or pin to hold the spare gate open. When you are parked on a side slope the weight of the spare pushes the gate into the tail gate and it is already starting to transfer paint between the two gates. Maybe reuse the safety pin that holds the gate shut?

I also need to take and post pictures of the license plate mount with LED lights, and the mounting of the OEM backup camera. I’ll also post pictures of my CB radio and antenna installation although I’m still struggeling with the mic holder since I don’t want to drill into the dash.
Looks great, and it will be nice to see a matching spare wheel & tire. I do agree the tire gate looks more at home with the snugtop then the ones I have seen with out it. Does that mean you will be selling your steelie? If so, I know someone that will buy it :)
 

Portager

■ ☼▐▐▐▐▐▐▐ ☼■
Messages
1,506
Location
Silverado
Looks great, and it will be nice to see a matching spare wheel & tire. I do agree the tire gate looks more at home with the snugtop then the ones I have seen with out it. Does that mean you will be selling your steelie? If so, I know someone that will buy it :)

Actually, I'd like to get 4 more steelies, but I do have a set of 20" chrome Dick Cepek wheels for sale. They come equipped with Perelli Scorpion A/T tires. :)
 

Bigunit

Hammer Down!
Staff member
Messages
6,561
Location
Arizona
I’ll also post pictures of my CB radio and antenna installation although I’m still struggeling with the mic holder since I don’t want to drill into the dash.

Mike, if you don't want to drill into the dash, here is one option you might want to consider. This is my CB mic set-up in my 3T:

I used the ProClip. No drilling so no marks left if you decided to do something different down the road. They clip on - it's a 2-piece set-up - you start with this mount:

http://www.proclipusa.com/brodit-ve...6-2012/proclip-center-mount-853702-14398.aspx

and then you will need to add this clip holder for the CB:

http://www.proclipusa.com/store/products/button-and-clip-holder-%28small%29-215052.aspx

The only drawback with this mount is that the ProClip does block some of the A/C air but it's worked great for me.
 

08SolarFlareH3

Super Swampers
Messages
2,525
Location
Finger Lakes, NY
Actually, I'd like to get 4 more steelies, but I do have a set of 20" chrome Dick Cepek wheels for sale. They come equipped with Perelli Scorpion A/T tires. :)
I have a set of 5 sitting in my closet, so I didn’t need it anyways but I couldn’t say no to another if one came up for sale :wink:. That KM2 looks great on that steelie, pretty sure that is what I am going to mount on the steelies.
 

Portager

■ ☼▐▐▐▐▐▐▐ ☼■
Messages
1,506
Location
Silverado
Here are pictures of the T with the spare gate and the cargo slide open.

IMG_0380.jpg

IMG_0381.jpg

IMG_0382.jpg


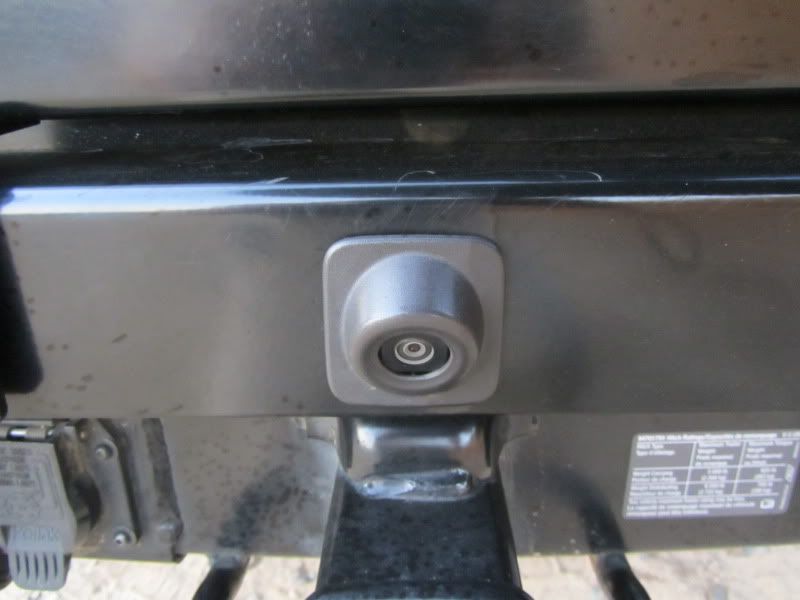
I had my mechanic at City Wide (it is right next door to my work, so it is very convenient for me) transfer the OEM backup camera to the new Thor Parts Bumper. They did a great job installing the camera, but due to the thickness of the bumper the outer housing blocked the corners of the camera field of view. The camera image was circular with black corners. They then ground the camera housing and the outer housing so that they fit closer together and now the full field of view is clear.
IMG_0377.jpg

IMG_0376.jpg


Here is a better shot of the locking lug nuts.
IMG_0375.jpg


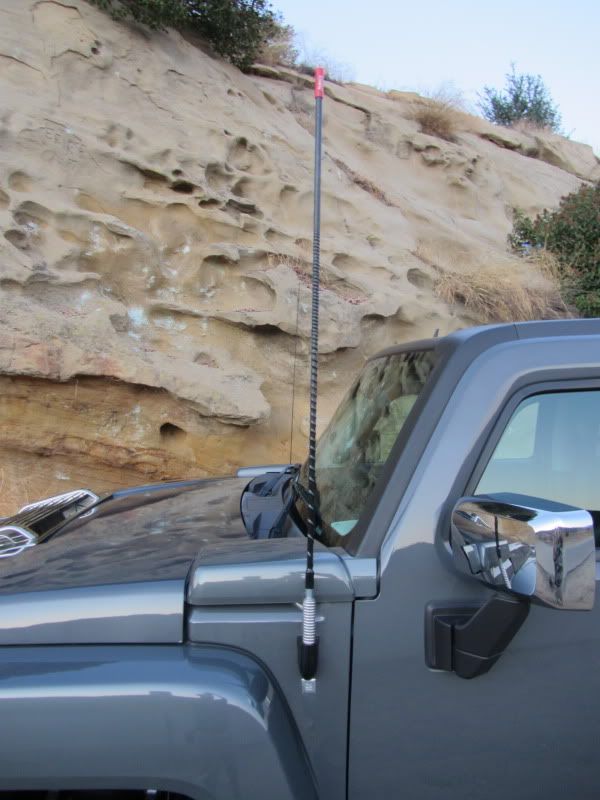
Here is a picture of the CB antenna installation.
IMG_0388.jpg


Finally a couple of night time pictures of the license plate mount lights. I used “WixTech LED License Plate/Accent Illeuminator Bolt Lamps - White/Red 43412” from Amazon for $34.95 per pair. These are a metal license plate mount bolts with LED lights inside. I was concerned the plastic ones might break off road. I purchased 2 pairs, a pair for the top and a pair for the bottom to even out the lighting better, but I decided having the lights shining up wouldn’t be good. When City Wide installed the lights they found that the first pair drew too much power and blew the fuse so they use the second set which worked fine.
IMG_0372.jpg
IMG_0371.jpg
 

Portager

■ ☼▐▐▐▐▐▐▐ ☼■
Messages
1,506
Location
Silverado
I posted pictures in the Hutchinson wheel thread, but I forgot to update my build thread. So here it is.

I decided to replaced the AR-392 Tactic Wheels and BFG KM2 305/70R16 (33”) tires with Hutchinson WA-0615 double beadlocks and Cooper Discoverer STT 315/75R16 (35”) tires. I decided to go with the Hutchinson’s because losing the bead on a tire on a solo trip would be a PITA, but losing 2 tires when we are solo would be a disaster. I figured I could either carry two spares or get double beadlocks. Also, the Hutchinson’s have the stock backspace so the tires are back inside the fenders (almost) where I think they belong. I decided to go with the black powder coat Hutchinson’s because they are supposed to be easier to touch up the paint and I think they look nice on the truck. I decided to go with the Cooper STT tires because I wanted tires that were a little quieter than the BFG KM2. So far I think they are a little quieter, but I’m still waiting for a chance to get off road and test the traction. Here is a picture of the driver’s side with the new wheels. I have noticed a little less acceleration, but with the Alpha it isn’t too bad. I also noticed the 35” tire rub the sway bar at full steering wheel cock, especially on a cross slope like my driveway, so I have to learn to stop just before the hard stops.
IMG_0487.jpg


The Hutchinson’s are designed to work with the stock OEM center caps, but I didn’t have any, so I bought center caps off ebay. I decided to get the chrome center caps because I think they will tie in with the rest of the chrome on my truck and I can always paint them if I get tired of the chrome. Besides the chrome center caps are cheaper than silver on ebay. Here is a close up of the wheels with the chrome center caps.
IMG_0488.jpg

IMG_0489.jpg


Here is a picture of the passenger’s side with one center cap missing. Since I took this picture I received the other two center caps but I don’t have pictures yet.
IMG_0492.jpg


Finally here is a picture looking down the side to show how much the tires protrude beyond the fenders.
IMG_0497.jpg
 

Portager

■ ☼▐▐▐▐▐▐▐ ☼■
Messages
1,506
Location
Silverado
I am definitely diggin the gif in your signature!! thats a sweet idea!!

Thanks, I tried multiple gif generators, but the one I found that worked the best was:

http://www.myspacegens.com/handler.php?gen=animatedimage&p=view

This one allowed me to upload 32 pictures (others had a 10 and 20 pictures limit) and it allowed me to make it 600 x 225 pixels (others had a 450 pixel limit).

Lesson learned, you need a very stable tripod and it is very difficult to avoid moving the camera when you press the button. A remote would help a lot! If my camera only had one.
 

Portager

■ ☼▐▐▐▐▐▐▐ ☼■
Messages
1,506
Location
Silverado
As you may know, my wife has some mobility issues, so I wanted steps for when her knee and/or ankle are bothering her. When I decided to replace the PowerSteps with RD Rock Bashers, I had Brodie start developing removable steps for the Rock Bashers. I receiver the first prototype step the other day and so I had to try it out.

These steps are really great, they have a double bar step surface that provides excellent footing and they are about half the distance from the ground to the Rock Bashers so it is much easier for my wife to climb in. They are held on by one bolt on each side so they are very quick and east to put on and take off. They also look like they belong on the RD Rock Bashers. Here are a couple picture of the new step on the driver's side of my truck.
IMG_0504.jpg

IMG_0506.jpg


and a some close ups of the step.
IMG_0507.jpg

IMG_0505.jpg

IMG_0508.jpg


These shots down the side of the truck shows how much the step extends past the tires.
IMG_0513.jpg

IMG_0514.jpg


For those concerned about weight, here is a picture on the scale showing 13.5 lbs per step. Since I’ll leave these at home when I off road I’m less concerned about weight than stable footing for my wife.
IMG_0502.jpg
 

Portager

■ ☼▐▐▐▐▐▐▐ ☼■
Messages
1,506
Location
Silverado
I just noticed I forgot to update this thread when I got the rear bumper and the RD Rock Bashers Line-X coated. Here are a few pictures showing the Line-X coating.

IMG_0738.jpg

IMG_0737.jpg

IMG_0736.jpg

IMG_0735.jpg


I like the Line-X “non-slip” surface on the top of the sliders. It makes a good surface to step on while climbing into the truck. However, if I had it to do over, I'd skip the Line-X and go with a rattle can finish and no-skid tape. The rough surface in the Line-X traps all kinds of dirt which is hard to clean. I might try my pressure washer in the future. Also, I've already torn up the Line-X on the bottom corner of rear bumper (on the trip to the Goodnight Irene claim). I think the rattle can solution would be easier to touch up.

Next, I’ve been pestering CJ to come up with a hold open for the spare tire swing gate. When I’m parked on a side slope with the passenger’s side higher than the driver’s side, the spare gate wants to swing shut and bang against the tailgate. This problem is exacerbated by my 9 degree sloped driveway and my 107 pound spare tire. We discussed many different hold open mechanisms and devices, but they all seamed overly complicated and some had the potential for damage due to operator error. Finally CJ came up with an elegant solution of using a hold open bar like is commonly used on a car hood. CJ went to a junk yard and acquired a hood hold open bar off a 1985 Jeep Cherokee and sent it to me (months ago). I finally got around to installing it, and it works great! I mounted it to the inside of the spare gate arm where it is hidden by the spare gate arm and drilled a “small” hole in the top surface of the bumper. The hold open bar had and a double bend at the tip, which I trimmed off to get a better fit.

IMG_0869.jpg


Next I added a small hook to hold the bar up out of the way when not in use.

IMG_0870.jpg

IMG_0872.jpg


Here are a couple shots from either side showing the hold open in the stowed position and the spare gate latched.

IMG_0873.jpg

IMG_0874.jpg


I’m quite pleased with the new hold open. It does its job perfectly holding the spare gate in place even in my 9 degree driveway as shown below.

IMG_0868.jpg


Thanks a lot CJ for a great solution! Too bad this rear bumper and spare gate isn’t still available to other H3T owners!
 
Last edited:

4speedfunk

Well-Known Member
Messages
4,250
Location
Tardville
Portager!...I was wondering if you ever got that thing installed. Looks great!

Shhhh......don't tell anybody but I have one of those T-bumpers left in my warehouse.
 
Top