
Here's a quick summary of how I swapped the front door panels on my 2007 Hummer H3 with a pair from a 2008 Hummer H3.
One of the changes for the 2008 model year H3 was to change the switch and handle positions on the interior door panels so that the handle is by your elbow, and the switches are up by your hand.
This helps you to prevent accidentally pressing the switches with your elbow.
I think the project was rather straight forward, and each door took me only part of an afternoon, learning as I went and taking pictures.
I ordered my panels on ebay from an 08 H3 which was being parted out. Luckily they came with most of the unique trim bits that I needed with the exception of one switch bezel.
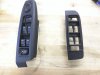
First off, the before and after picture. I'm showing just the driver side, and the passenger side is just mirrored, and simpler with just the one switch.

You can see that the switches are now in a much more comfortable spot.
First things first, you need to remove the door panel, and there are three screws.
#1 is behind the door latch, behind a little circular cover.
#2 and #3 are behind the bit of trim covering the grab handle. You can pop the trip off with a small screwdriver or something.
If I remember correctly they are Torx headed.
Once the screws are removed, you can go around the perimeter and pop the snap fittings out of the door.
Then you get to peel the foam panel piece off the door too. The goop was still sticky for me and peeled off slowly but surely.
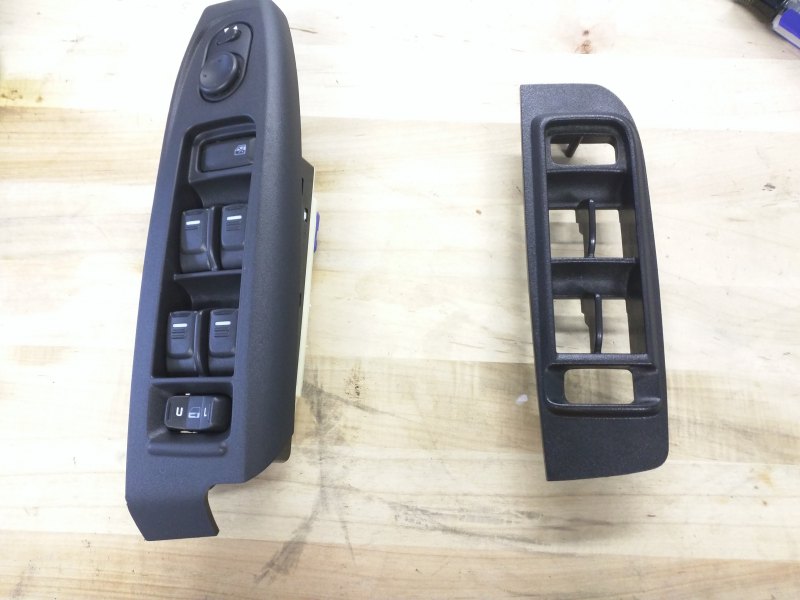
For the driver side, I needed to purchase a new bezel to hold the switches. The GM part number was 25876084.
The window switches are unchanged between the years, only the bezel is different. Here's a picture of them installed in the new bezel.
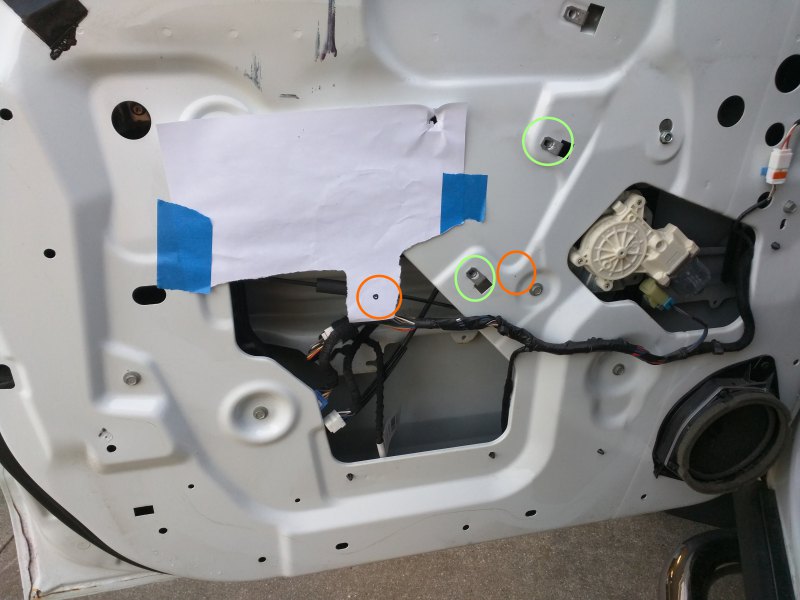
The most challenging part was making new mounting points for the door handle to attach to the door.
All of the perimeter snap mounting points are the same layout, but because the handle moved, the handle screws also moved.
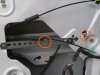
Shown here in green are the old mounting points, and in orange are the new positions.
I fit the panel up and marked the locations with a permanent marker before removing it again and drilling the new holes.
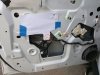
I bridged the gap by riveting across a piece of galvanized steel angle bracket from the local hardware store, and I used a drill to make a new hole for the other clip nut.
Here it is all finished up, and ready for the door to install.

You will also notice that you need a longer bolt and a little spacer for the inboard door handle mounting location.
I bought and used a bag of 50mm M6x1.0 bolts, but you could get away with some as short as 35mm I believe.
I also just chopped off a maybe 20mm long section of pvc pipe to act as a spacer, but really anything close to the required shape would probably do.
One last thing to possibly buy is a new door mirror adjusting switch. Due to the new bezel having it rotated 90 degrees, the directional buttons are also 90 degrees off. I have not replaced it because I don't really mind, but when I was looking as the various part numbers, I think I saw that you can order a newer one that will likely have the correct rotation.
So, upgrade those doors, and happy wheeling! On an unrelated note, I took the H3 through some woods for the first time and was really really impressed with the turn radius, ground clearance over logs, and ability to fit through just impossibly narrow looking gaps. Woods driving is a great way to learn your corners.
One of the changes for the 2008 model year H3 was to change the switch and handle positions on the interior door panels so that the handle is by your elbow, and the switches are up by your hand.
This helps you to prevent accidentally pressing the switches with your elbow.
I think the project was rather straight forward, and each door took me only part of an afternoon, learning as I went and taking pictures.
I ordered my panels on ebay from an 08 H3 which was being parted out. Luckily they came with most of the unique trim bits that I needed with the exception of one switch bezel.
First off, the before and after picture. I'm showing just the driver side, and the passenger side is just mirrored, and simpler with just the one switch.
You can see that the switches are now in a much more comfortable spot.
First things first, you need to remove the door panel, and there are three screws.
#1 is behind the door latch, behind a little circular cover.
#2 and #3 are behind the bit of trim covering the grab handle. You can pop the trip off with a small screwdriver or something.
If I remember correctly they are Torx headed.
Once the screws are removed, you can go around the perimeter and pop the snap fittings out of the door.
Then you get to peel the foam panel piece off the door too. The goop was still sticky for me and peeled off slowly but surely.
For the driver side, I needed to purchase a new bezel to hold the switches. The GM part number was 25876084.
The window switches are unchanged between the years, only the bezel is different. Here's a picture of them installed in the new bezel.
The most challenging part was making new mounting points for the door handle to attach to the door.
All of the perimeter snap mounting points are the same layout, but because the handle moved, the handle screws also moved.
Shown here in green are the old mounting points, and in orange are the new positions.
I fit the panel up and marked the locations with a permanent marker before removing it again and drilling the new holes.
I bridged the gap by riveting across a piece of galvanized steel angle bracket from the local hardware store, and I used a drill to make a new hole for the other clip nut.
Here it is all finished up, and ready for the door to install.
You will also notice that you need a longer bolt and a little spacer for the inboard door handle mounting location.
I bought and used a bag of 50mm M6x1.0 bolts, but you could get away with some as short as 35mm I believe.
I also just chopped off a maybe 20mm long section of pvc pipe to act as a spacer, but really anything close to the required shape would probably do.
One last thing to possibly buy is a new door mirror adjusting switch. Due to the new bezel having it rotated 90 degrees, the directional buttons are also 90 degrees off. I have not replaced it because I don't really mind, but when I was looking as the various part numbers, I think I saw that you can order a newer one that will likely have the correct rotation.
So, upgrade those doors, and happy wheeling! On an unrelated note, I took the H3 through some woods for the first time and was really really impressed with the turn radius, ground clearance over logs, and ability to fit through just impossibly narrow looking gaps. Woods driving is a great way to learn your corners.
")


