
-
Welcome to H4O! For a reduced ad experience, please login or register with the forum.
You are using an out of date browser. It may not display this or other websites correctly.
You should upgrade or use an alternative browser.
You should upgrade or use an alternative browser.
HUNNER EXtreme Steering Rack Sleeves
- Thread starter Hunner
- Start date
cbetts
NERD!!!
- Messages
- 3,182
- Location
- Rancho Palos Verdes, CA
Count me in too.
06 H3
a.k.a. "The Jackal"
- Messages
- 9,352
- Location
- Meridian, ID
Count me in too.
Should be a good mod and now I know where to go if I have issues with the install or vice versa
DJinCO
Well-Known Member
- Messages
- 1,565
Hunner, I need one of those. Count me in.
Ok here it is. I will put this at the top but here for now so it shows as a new post.
$40 shipped.
Think you guys can handle that??
I worked out how to place the order by sending a Purchase order and arranged payment by business account check, and shipping, thru a mutual agreement by setting up an account. I don't have to do that much for my small business of Yacht Repair and Photography.
Custom production order approx. 3 weeks
I ordered 20 to get a bit of a price break, so that should take care of EDIT:17 of you that posted so far and I will fill the orders in the order of the posts first. It's been years since I did this mod and only two people have bought any by asking if I could get them. Now I guess mileage offroad is accumulating.
What will happen is to get that price again I would have to get 20 more and I'm not sure when I would have that many more sold to justify that.
When I get them then I will ask for payment, and see who commits.
What I had to consider just so you know.
Cost of bushing plus shipping to me.
I found that if I cut them they will fit a free small flat rate USPS priority mail box and is cheaper than parcel post.
so I will use some of my heavy kraft paper I pack the skids with so they will pass the rattle test
I don't trust the peel and stick seal on these boxes so I will use some nylon reinforced tape
still not sure if there is a paypal fee on this price still looking for that minimum
Besides cutting them and some discs for that and packing them up
I have to claim the income thru my business to be legit and pay Obama and the IRS there share and local government and state taxes.
Small businesses are getting hammered.
Anyway another Hunner mod is available in a few weeks.
Last edited:
- Messages
- 10,400
- Location
- Central Texas
Hunner, you need to make a fair mark up. No one will complain about that. Thanks for putting out the time and effort to bring these to us. I am definitely in for one.
kd7irm
Regular Guy
- Messages
- 175
- Location
- Bagdad, Az
Defiantly put me on the list Hunner!
(Don't laugh Alex!")
Sent from my DROIDX using Tapatalk
(Don't laugh Alex!
Sent from my DROIDX using Tapatalk
M
MUTAINT
Guest
I got one of these sleeves from Hunner & will be doing my fix the next time the bushing wears out. Mine is cut and ready to go!
Hunner is it possible to put the sleeve on without removing the rack?
If not Hunner, could you come to Arizona and help me install mine? ...just kidding...kind of! :shifty:
Did Mutaint ever put his on his rig?
Not yet. I'm waiting to turn 50K soon. If I need a new rack by then I'll have a new rack & the Hunner reinforcement!
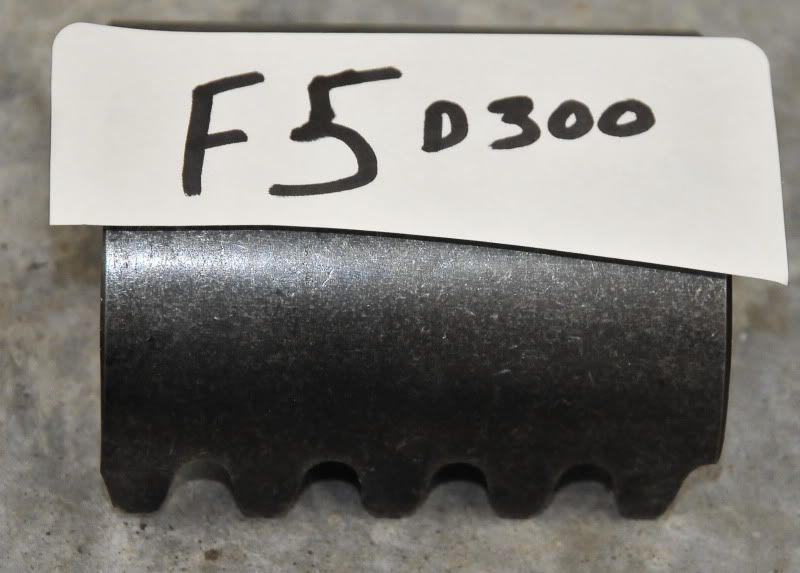
This is some hard stuff, destroyed this disc!!
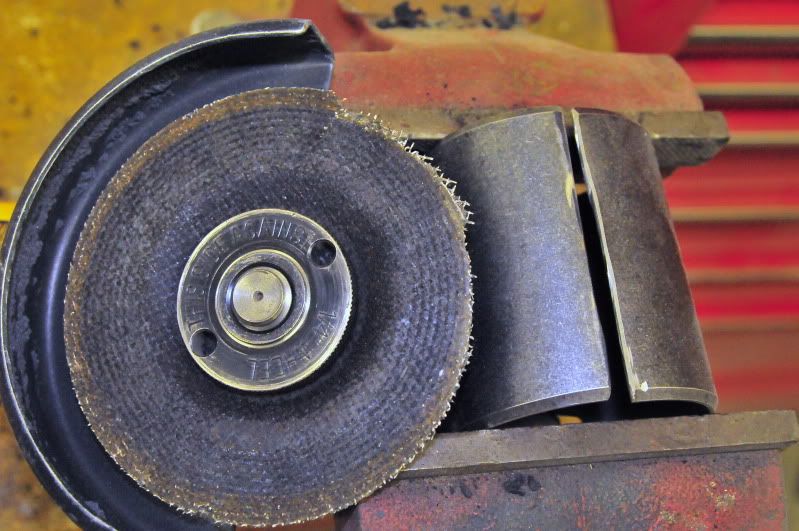
No sheet!:thumbs: My ginder wheel looked like that after cutting just 1 of them. I haven't cut the other yet.
NOW, yo offer them "pre-cut"! :wink:
Going to the dealer next week for the "my 50K warranty is running out" list of things to check/replace. After that the bigger mods can begin:corn:
I told ya! It would not have been as bad but I got it in a bind trying to hang on! It looked like a B grade movie special effect with all the sparks flying. Ever notice that in those movies they always have a shot of somebody grinding in a dark warehouse. It's probably these things they are grinding!
They told me today they were heat treated and passed on this bit of description.
"Upon insertion into the holding bore (bracket in our case) the compression of the bushing allows the teeth to make contact on one side along the plain of the seam. The installed bushing has an operational radial and tangenitial force. As a result, there is high contact pressure between the bushing and the housing."
I thought that was an interesting bit of info.
Last edited:
H3slate
Brush raked
- Messages
- 983
- Location
- Tualatin, Oregon
Sounds like a good price! Put me down for one set.
ncalphadog
Jaws with Paws
- Messages
- 114
- Location
- Salisbury, NC
+1 for me.....thanks for offering them.
For that new CE??
No, not yet, but I'd like to have one for down the road when I know I will need it for the CE. By the time I'll need it & with my luck, the rig will be out of warranty and who knows if I'll be able to find one then.
H3-ING
AdventureTime
- Messages
- 156
- Location
- Newport Heights
Put me on the list
Thanks.
Thanks.
f5moab
Mr. Beretta
- Messages
- 1,986
- Location
- Hiding in a potato patch in Idaho
I'll take one....
(Is that 20?)
(Is that 20?)
06 H3
a.k.a. "The Jackal"
- Messages
- 9,352
- Location
- Meridian, ID
If you need a bigger order for the price being cheaper ill take 2 or 3. Ill hold onto em and sell em later or use if I ever get another one
Sent from my DROIDX using Tapatalk
Sent from my DROIDX using Tapatalk
ATTENTION MUTAINT AND BIG UNIT
Growing up on a farm and doing lots of mechanical repairs thru the years as well as custom race car fabrication, a lot of this is just another day at the office for me so seeing over the years some people on the forums do not have a place or tools to do these things, I always try to explain in detail. Might be overkill for some but bear with me for the benefit of others.
As time goes by, we as a group are going to have to do these things ourselves or find friends with the skills or independent shops willing to attempt them.
Since you two guys have these already and may be installing them soon, I thought I should point out a couple of things. I have my spare rack set up so I could review how I did this. I have a spare sleeve I can use to mock this up.
This will also be an install thread I will move up to the start when I get it done.
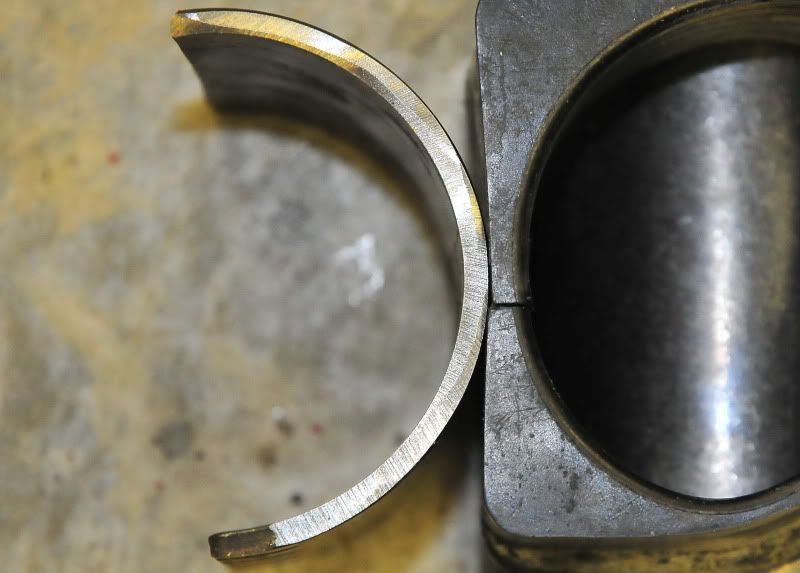
First thing is you two need to know this before you try to install. I see that I had to grind off both ends of the sleeve where there is a taper. They tell me that is the way they are made and there is not an option. So it takes just a little grinding to make them fit snug down in the space between the hydraulic line fitting and rack end nut. Truly a custom fit. It will help retain the sleeve as well.
I will do this on the ones I have coming so they will be ready to install.
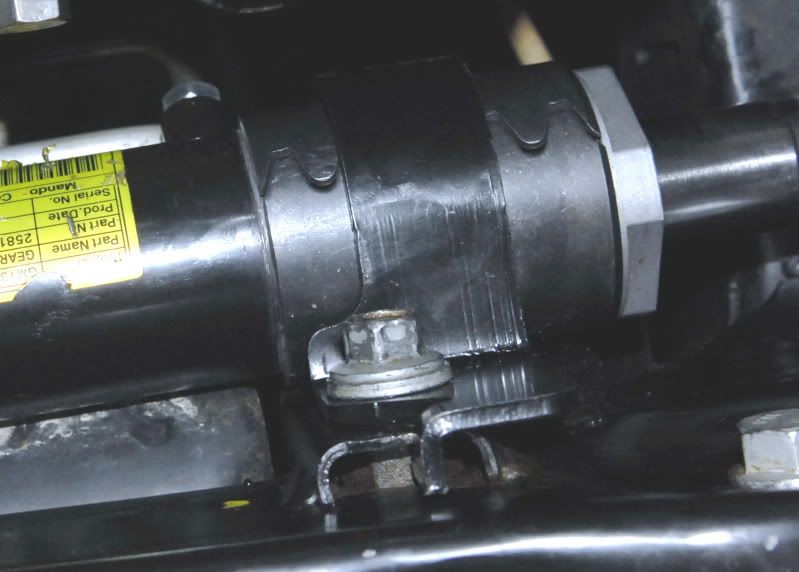
This shot without grinding that taper shows it would sit on the rack end nut. Not good, it should go down flush to the tube.
This first shot also shows the cut side and how it allows the bracket to "crush" the halves together. I put the teeth on the bottom in the actual install. I wanted the "halves to be front to back so the halves are pushed together.
If the bushing is not tight after putting the bracket on the only option is to remove the bracket and grind a little on the back side of that bracket where it contacts the other surface on the back side under the bolts.
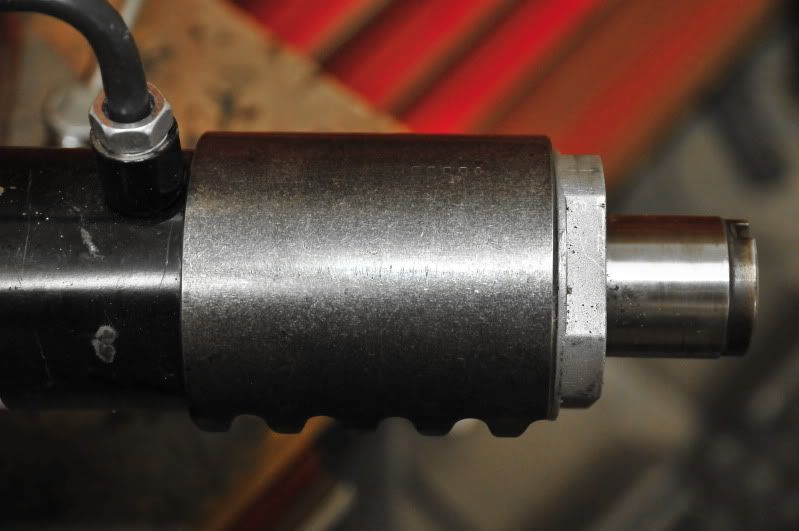
Be sure and clean any metal shavings off the rack, like I see in this picture so as not to damage the seal during movement!

This is after I ground off the taper.
It has been so long since I ran stock tie rods I can't remember how far on the tube the boots go.
However they will fit over the sleeve.
On my BP tie rods I had to modify the outer end of the boot but also tried to re-install some while messing with all of this. I tried a large 1/4 wide zip tie but it kept slipping off. I tried a SS hose clamp but the screw assembly would cut the boot at full lock turn because of the way my boots are compressed.
I think for stock tie rods you should get a Lysle banding tool $9.00 Part #30950 and some CV Replacement boot band clamps $.65 part# QUD 636-3003 they come 19" long AND you can use them for CV boots as it says. You should have some spares in your bag with spare tie rods anyway.
You won't need to replace your existing boot on that end if it is in good shape. But you will probably have to cut the band on there now.
I should have some new boots today I ordered from the GMC dealer. They cut me some slack but they were still $30.00 each. Need to search for a cheaper source if possible.
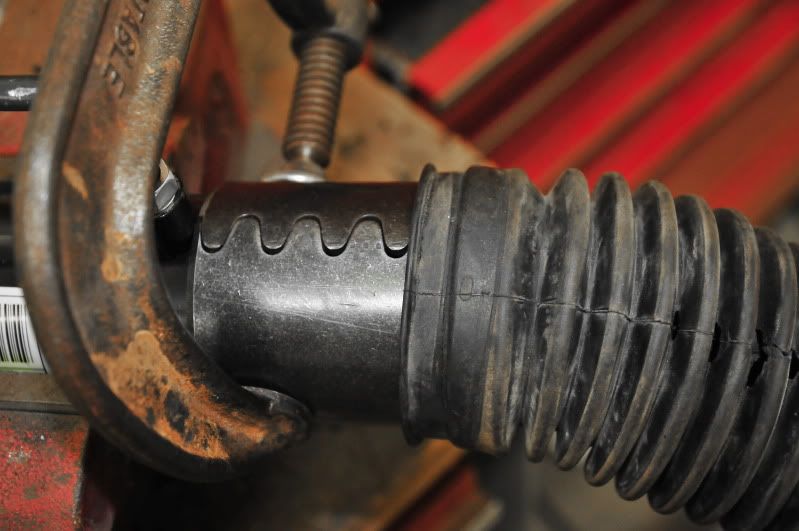
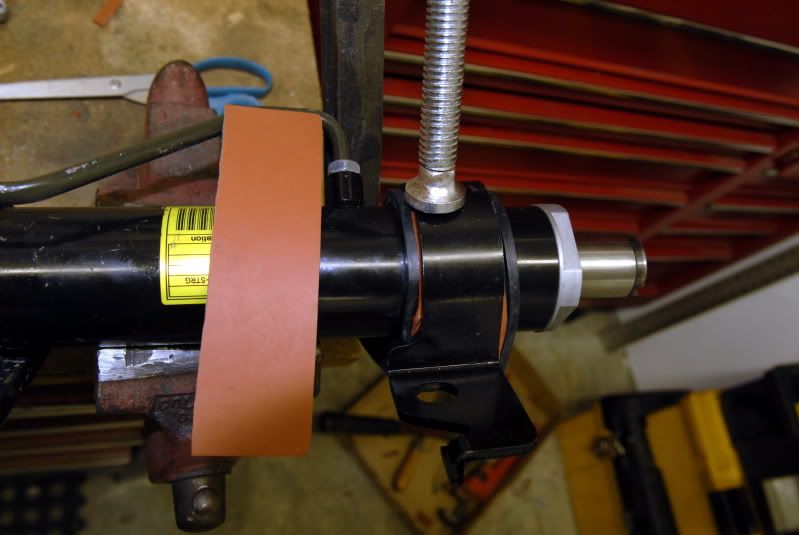
This is the only shot I have of a stock rack with band clamp. The bushing is on there but I'm not sure that is exactly where it goes, this is just for display.

I also want to point out I took careful consideration in comparing the thickness of the sleeve to the rubber bushing so as not to add any pressure or misalignment of the rack which would cause leverage on the other end where they break.
As always no question is a dumb question. I never claim to be an expert or engineer, I just made some practical mods that I only share after I have tested them for many miles. If I did not make something clear please point it out. I want this to be as painless as possible and solve this source of problems.
Also I should make a note that you are using the OEM bracket, so if it is designed to breakaway in an accident I don't see how this would prevent that. Those two bolts mount the bracket real solid it's the rubber bushing that is the problem, in my opinion. In case you have not seen this and I know not on here, I tried to see what would happen by adding rubber to the bushing. I was not impressed and the whole mess soon squished out from movement.
Growing up on a farm and doing lots of mechanical repairs thru the years as well as custom race car fabrication, a lot of this is just another day at the office for me so seeing over the years some people on the forums do not have a place or tools to do these things, I always try to explain in detail. Might be overkill for some but bear with me for the benefit of others.
As time goes by, we as a group are going to have to do these things ourselves or find friends with the skills or independent shops willing to attempt them.
Since you two guys have these already and may be installing them soon, I thought I should point out a couple of things. I have my spare rack set up so I could review how I did this. I have a spare sleeve I can use to mock this up.
This will also be an install thread I will move up to the start when I get it done.
First thing is you two need to know this before you try to install. I see that I had to grind off both ends of the sleeve where there is a taper. They tell me that is the way they are made and there is not an option. So it takes just a little grinding to make them fit snug down in the space between the hydraulic line fitting and rack end nut. Truly a custom fit. It will help retain the sleeve as well.
I will do this on the ones I have coming so they will be ready to install.
This shot without grinding that taper shows it would sit on the rack end nut. Not good, it should go down flush to the tube.
This first shot also shows the cut side and how it allows the bracket to "crush" the halves together. I put the teeth on the bottom in the actual install. I wanted the "halves to be front to back so the halves are pushed together.
If the bushing is not tight after putting the bracket on the only option is to remove the bracket and grind a little on the back side of that bracket where it contacts the other surface on the back side under the bolts.
Be sure and clean any metal shavings off the rack, like I see in this picture so as not to damage the seal during movement!
This is after I ground off the taper.
It has been so long since I ran stock tie rods I can't remember how far on the tube the boots go.
However they will fit over the sleeve.
On my BP tie rods I had to modify the outer end of the boot but also tried to re-install some while messing with all of this. I tried a large 1/4 wide zip tie but it kept slipping off. I tried a SS hose clamp but the screw assembly would cut the boot at full lock turn because of the way my boots are compressed.
I think for stock tie rods you should get a Lysle banding tool $9.00 Part #30950 and some CV Replacement boot band clamps $.65 part# QUD 636-3003 they come 19" long AND you can use them for CV boots as it says. You should have some spares in your bag with spare tie rods anyway.
You won't need to replace your existing boot on that end if it is in good shape. But you will probably have to cut the band on there now.
I should have some new boots today I ordered from the GMC dealer. They cut me some slack but they were still $30.00 each. Need to search for a cheaper source if possible.
This is the only shot I have of a stock rack with band clamp. The bushing is on there but I'm not sure that is exactly where it goes, this is just for display.
I also want to point out I took careful consideration in comparing the thickness of the sleeve to the rubber bushing so as not to add any pressure or misalignment of the rack which would cause leverage on the other end where they break.
As always no question is a dumb question. I never claim to be an expert or engineer, I just made some practical mods that I only share after I have tested them for many miles. If I did not make something clear please point it out. I want this to be as painless as possible and solve this source of problems.
Also I should make a note that you are using the OEM bracket, so if it is designed to breakaway in an accident I don't see how this would prevent that. Those two bolts mount the bracket real solid it's the rubber bushing that is the problem, in my opinion. In case you have not seen this and I know not on here, I tried to see what would happen by adding rubber to the bushing. I was not impressed and the whole mess soon squished out from movement.
Last edited:
It has been so long since I ran stock tie rods I can't remember how far on the tube the boots go.
However they will fit over the sleeve.
This is the only shot I have of a stock rack with band clamp. The bushing is on there but I'm not sure that is exactly where it goes just for display.
A million thanks to you Hunner for providing the detailed pics and explanations. You just answered my remaining questions regarding:
1) grinding off both ends of the sleeve where there is a taper to make them fit snug down in the space between the hydraulic line fitting and rack end nut so that the sleeve doesn't sit on the rack end nut and instead goes down flush to the tube; and
2) grinding a little on the back side of the bracket where it contacts the other surface on the back side under the bolts if the bushing is not tight after putting the bracket on. You had mentioned those things before, but the pics now make it easier for me to understand because I'm a simpleton when it comes to this sort of stuff!
I have an extra rack with the stock tie rods and boots already on it - so I can see how far on the steering rack tube, the boots go with your new sleeve and with the mount barcket on and I can take pics and let you know. Thanks again Hunner
Yeah that last part would be good to know about the boot. I was trying to figure it by the width of the rubber bushing in that picture. I think the boot will have to be slid off and replaced over the bushing on stock ones to get far enough to clamp it. A picture of that might help people understand what the heck we are talking about. It takes me some time to go back and explain what I did as I sort of made it up as I tried to install it. I will eventually have it all in order at the top in an install post.
I am very interested in your installation and see how it goes. I have mentioned this top bolt before, so don't cuss me when you work on that! I did not design that part.:no:
I am very interested in your installation and see how it goes. I have mentioned this top bolt before, so don't cuss me when you work on that! I did not design that part.:no:
Last edited:
M
MUTAINT
Guest
I have a "spare" rack also and I hav e been using it for "fitiment" and such. I did notice the taper was going to push the Hunner bracket to where it was going to cover the nut. Grinding it down was my thought, thanks for the heads up so I don't have to second guess myself.....at least on this one!!
I had already ordered 20 and did not have to have them all spoken for before ordering, I was speculating.:shifty: Well it hit 20 that are spoken for. 06H3 you are welcome to all you want but this is just another example of the mindset of this core group cooperating for the good of all. Thank you for that offer.
I just solved the problem by having them amend my purchase order to 30!! The next price break is at 50.
Here is their reply.
With 30 pieces, we have maxed out how many we can run through the
> small-order department. Any additional quantities would need to go on a
> new order and would take about 6 weeks to produce. Thank you and I'm
> glad to hear that there is interest in our product.
>
So I will get 10 more for now.
Fixed
I already had one with your name on it F5, see
Last edited:
I have a "spare" rack also and I hav e been using it for "fitiment" and such. I did notice the taper was going to push the Hunner bracket to where it was going to cover the nut. Grinding it down was my thought, thanks for the heads up so I don't have to second guess myself.....at least on this one!!
I'm glad somebody is watching my back. I invite all questions and constructive suggestions.
I just know it works for me and has for many miles.
You all are sharing in the ongoing preservation of the species Hummer sub species H3/H3T!
I hope a source for racks can be found since SOME people are hoarding:shifty: I really like this guy.