
4speedfunk
Well-Known Member
- Messages
- 4,212
- Location
- Tardville
Well, like everything else on this project...I've done, and re-done each task 3 to 4 times to get it right. I've finally settled on a steering system and I thought I would post it up for other guys that might be considering a SAS. I had a couple of failed steering attempts and I'm convinced this is the way to go. I think this system will work well regardless of your suspension...leaf, coil, coilover, whatever. The box is from a Gen 1 (2001-ish) Nissan Xterra...(easy to spot because the newer Gen 2 Xterras are rack & pinion). This is the "metric" version of the Ford Bronco "Delphi" box, and it comes with splines on the input and sector shafts that require you to use matching Nissan parts. You can grab the Ford version, as it is an identical casting but, assumably it takes Ford-splined parts. For this write-up...I'm using the Nissan version, and I'll show you how to get it on your H3.
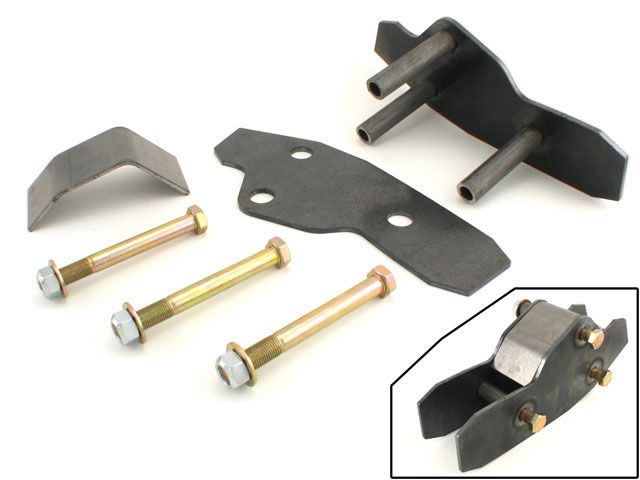
First...you'll need to beef-up your frame rail. I welded a full-length plate to the outside and a smaller one on the inside but, it still crushed a tad when I tightened the mounting bolts...so, I'm going to add some additional plating to the top and bottom so the entire frame is boxed with 1/4" steel. The H3 has a very flemsy frame and you should beef the snot out of the frame rails, especially if you're using a leaf-spring suspension. The rails are particularly wimpy toward the front (right where your forward leaf spring mounts would be)...
View attachment 5001 View attachment 5002
You'll need to locate the box as far forward as you can get it, so you have room for the pitman arm to swing and work the draglink properly. This will require trimming of the radiator support, inner fender and some misc. sheet metal near the body mount. The box mounts with (4) bolts and there is just barely enough frame rail height for all four of em. You will also need to re-do the brake lines and t-block (on the inside) as they will be in the way of the new box....
View attachment 5007
The pitman arm can be enlarged for a GM 1-ton draglink end by using a 7-degree tapered reamer. I chose to put my DRE pointing up. This is pretty straightforward process...
View attachment 5004
I decided to use the H3 intermediate steering shaft. In fact...it requires no modification whatsoever. Its the perfect length, and the coupler is much nicer (machined) than the one that comes on the Xterra (stamped). Not to mention, I think the heat from welding would melt the grease from the u-joint if I tried to mate the two shafts by welding (H3 on the right)...
View attachment 5005
The input shaft on the Nissan is splined, and slightly larger than the DD on the H3 steering rack. So, I grabbed an angle grinder and slowly shaved-down the splines on the Nissan input shaft. Once I got it to the same diameter as the H3 rack input shaft...I carefully ground "flats" on two sides of it. Make sure to set your steering wheel and the pitman arm in the "centered" position, so you know where to grind the flats. Once again...go slow...and test fit often. When done...clean it up with a hand file and grind a small half-moon divit into the shaft so the pinch-bolt can be installed. The outcome is much nicer than I was expecting. It looks damn near "factory"...
View attachment 5003 View attachment 5006
The remainder of the system will be some minor fittings and hoses. The Nissan uses metric flare fittings at the box...14mm supply and 16mm return. Earl's hooked me up with all the necessary adapters, and I chose to convert to -AN fittings for ease of making my own hoses. Another adapter is required at the H3 steering pump for the pressure line (some sort of o-ring flare thingy). The return line uses a clamp. The hose is 201-6 spec 5/16"...rated to God knows what rediculous pressure! Probably overkill...but it was only a tad more than regular p.s. hose. I bought nine feet of it. Prices below...
Used Nissan box.....$150.
Nissan pitman........$0 (included with box)
Tapered reamer.....$90.
1/4" plate steel.....$15.
mounting bolts......$5.
9' of hose............$46.
Earls fittings.........$64.
Fluid....................$6
Total...$376
Thats pretty much it for the steering box conversion. I'll let you know how this works on the ground. I have considerable more info on the rest of the steering but, I thought I would limit this thread to the box install. I'll save the cross-over linkage build for another thread.

")