• Welcome to H4O! For a reduced ad experience, please login or register with the forum.

H3 Rear Drain Tubes: Where & How-To

southernhummerguy

Active Member
Messages
31
Location
Columbia, SC
The stars finally aligned and I was able to clean out my rear sunroof drain tubes. So, I thought I could help out by showing the process in detail.

Tools needed:
1. Ratchet
2. 8mm Socket
3. T-15 Torx Star Bit
4. T-50 Torx Star Bit
5. Phillips Head Screwdriver
6. Flat Head Screwdriver or Needle Nose Pliers

*Disconnect the Battery*

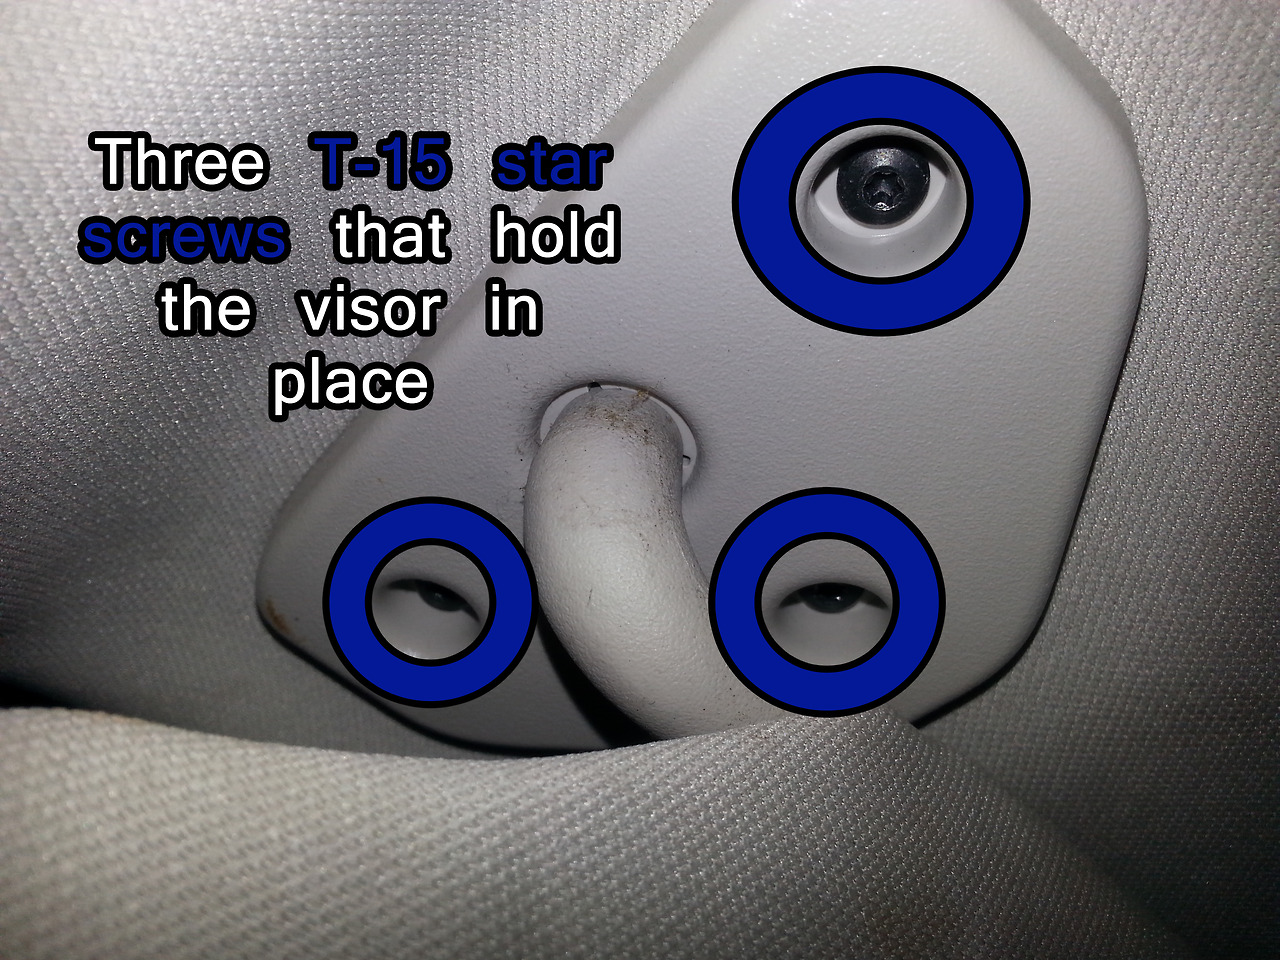
Step 1 - Removing the Sun Visors and Ceiling Handles

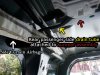
This is pretty straight forward, use a T-15 star bit to remove the 3 screws that hold the visor in place and 1 screw that holds the visor clip. The clip can be a bit troublesome because there is a small metal piece that holds the front of the visor clip to the headliner. Either leave it attached as is, or pull the visor clip off and save the metal piece. Undo the center piece on the ceiling handles to access two 8mm bolts. Remove the all six 8mm bolts from the three ceiling handles. There is a plastic for both the visors and handles that lies between the headliner and metal roof. Be sure to keep track of them for later.

attachment.php


attachment.php


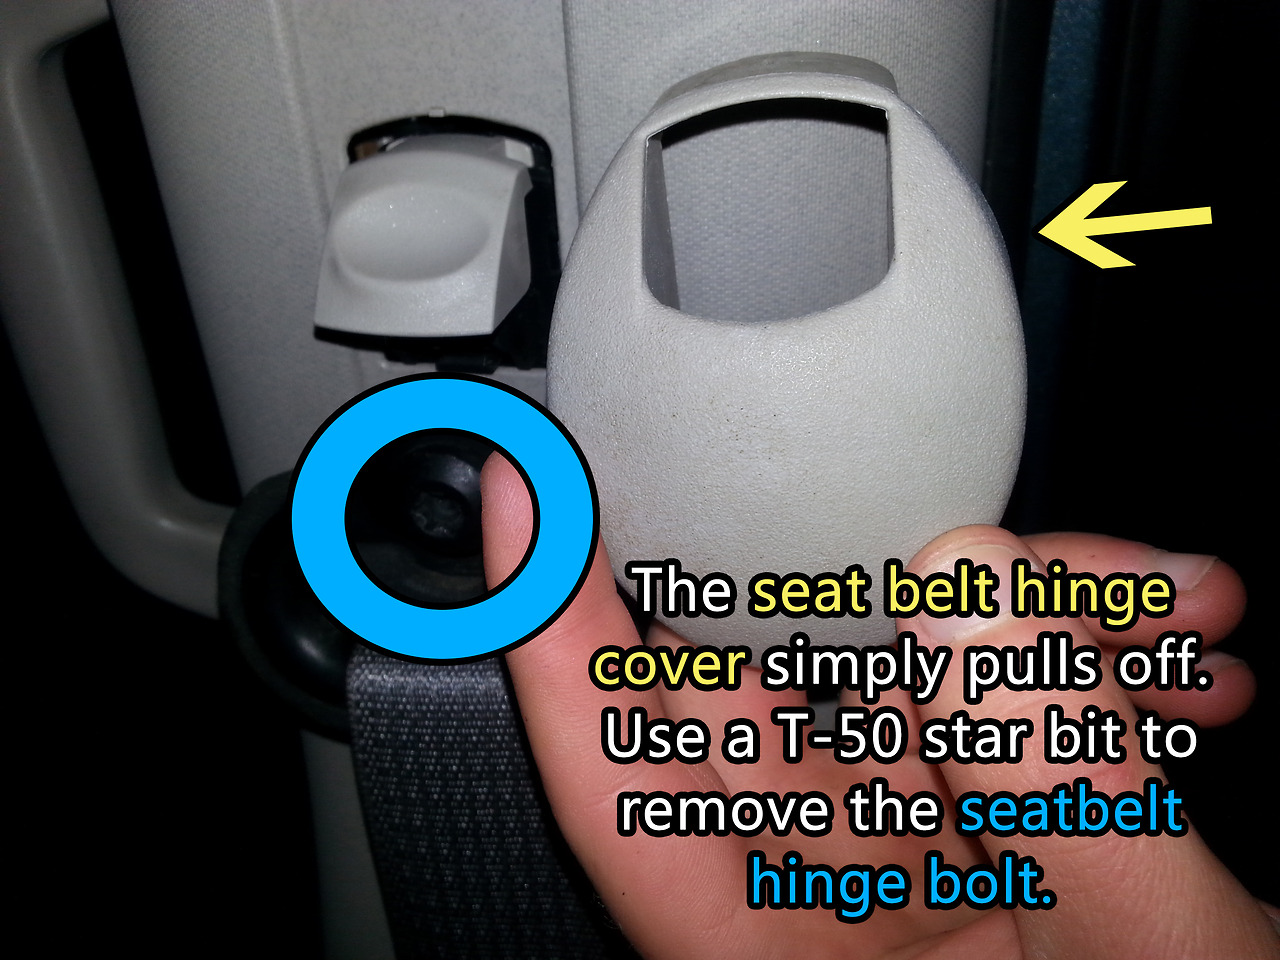
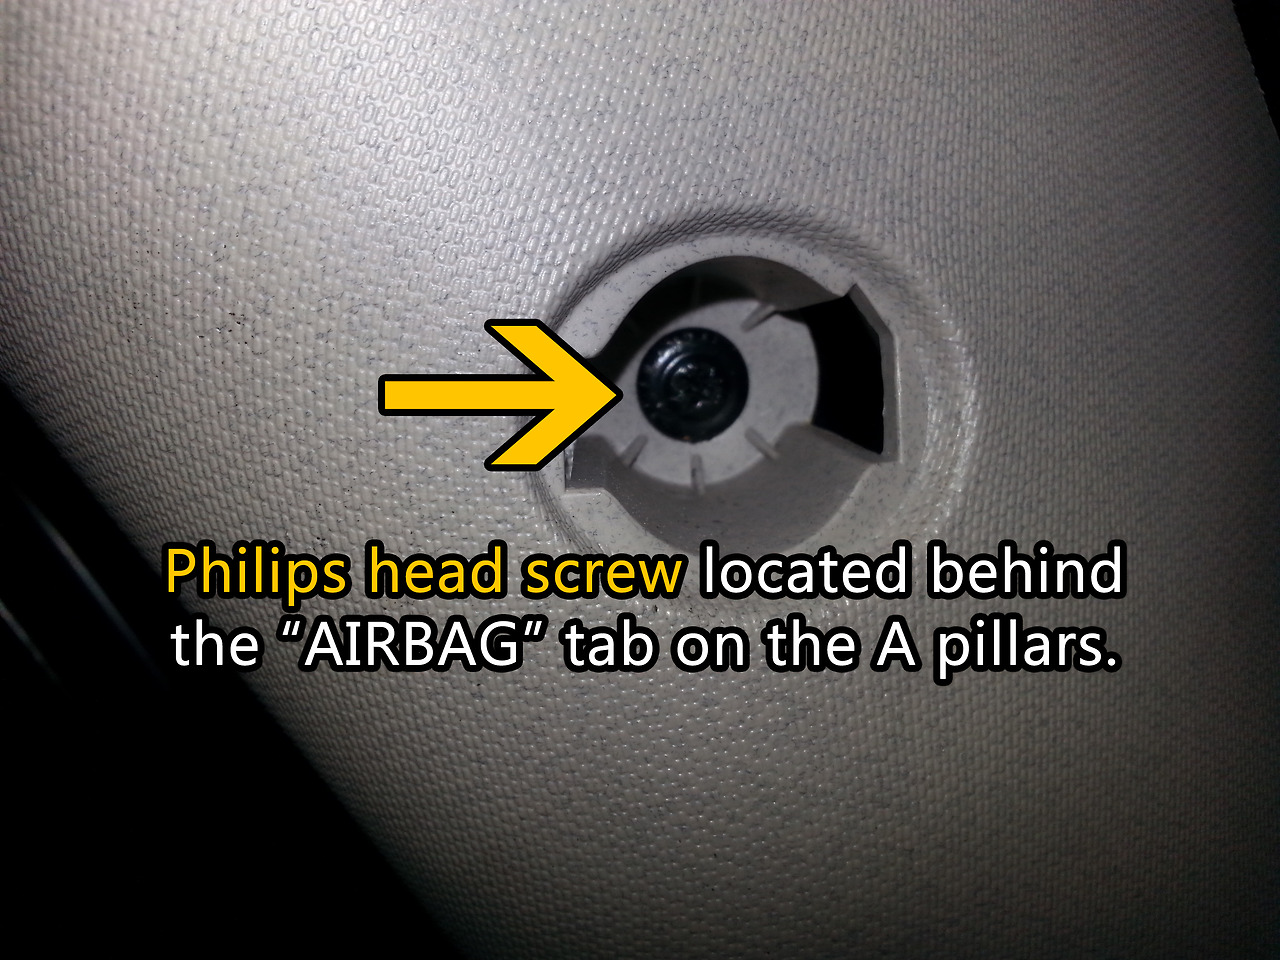
Step 2 - Removing the Garnish Moldings

Remove the "Airbag" tabs on both A pillars and C pillars to access and remove the phillips head screw. Remove the seat belt hinge covers to access the bolt that hold it to the pillar (B and C). Use a T-50 star bit to remove the bolt and seat belt hinge. The rest is a little elbow grease to pry the moldings off. The moldings are secured tightly for a reason, so don't be afraid to use a little extra muscle. Removing the weather stripping around the doors is also recommended because it tends to hold the pieces in place and allows for a better grip.

attachment.php

attachment.php


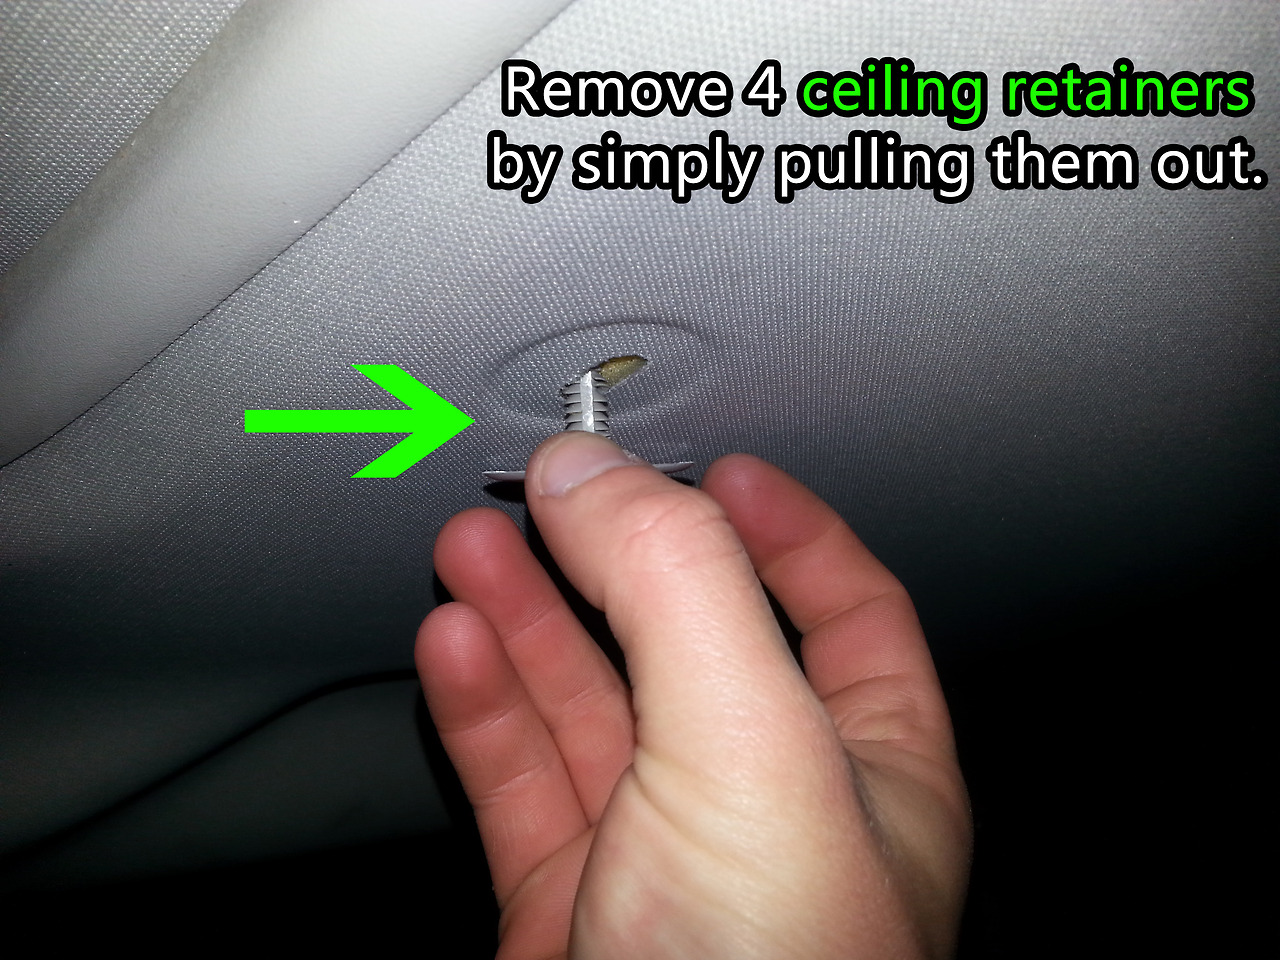
Step 3 (Optional) - Headliner Connections and Removal

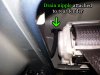
Once the garnish moldings are removed, use a flathead screwdriver, needle nose pliers, or your fingers to remove the 4 ceiling retainers and release the headliner. With the headliner free disconnect the two electrical connections near the A pillars and the OnStar mic. There is a small black retainer that holds the wires to the pillar. Use a flathead screw driver or pair of needle nose pliers to undo it from the metal. With all the connections undone pull the headline out from the rear. NOTE: If removing the headliner, you should remove the sunroof weather stripping before hand.

attachment.php


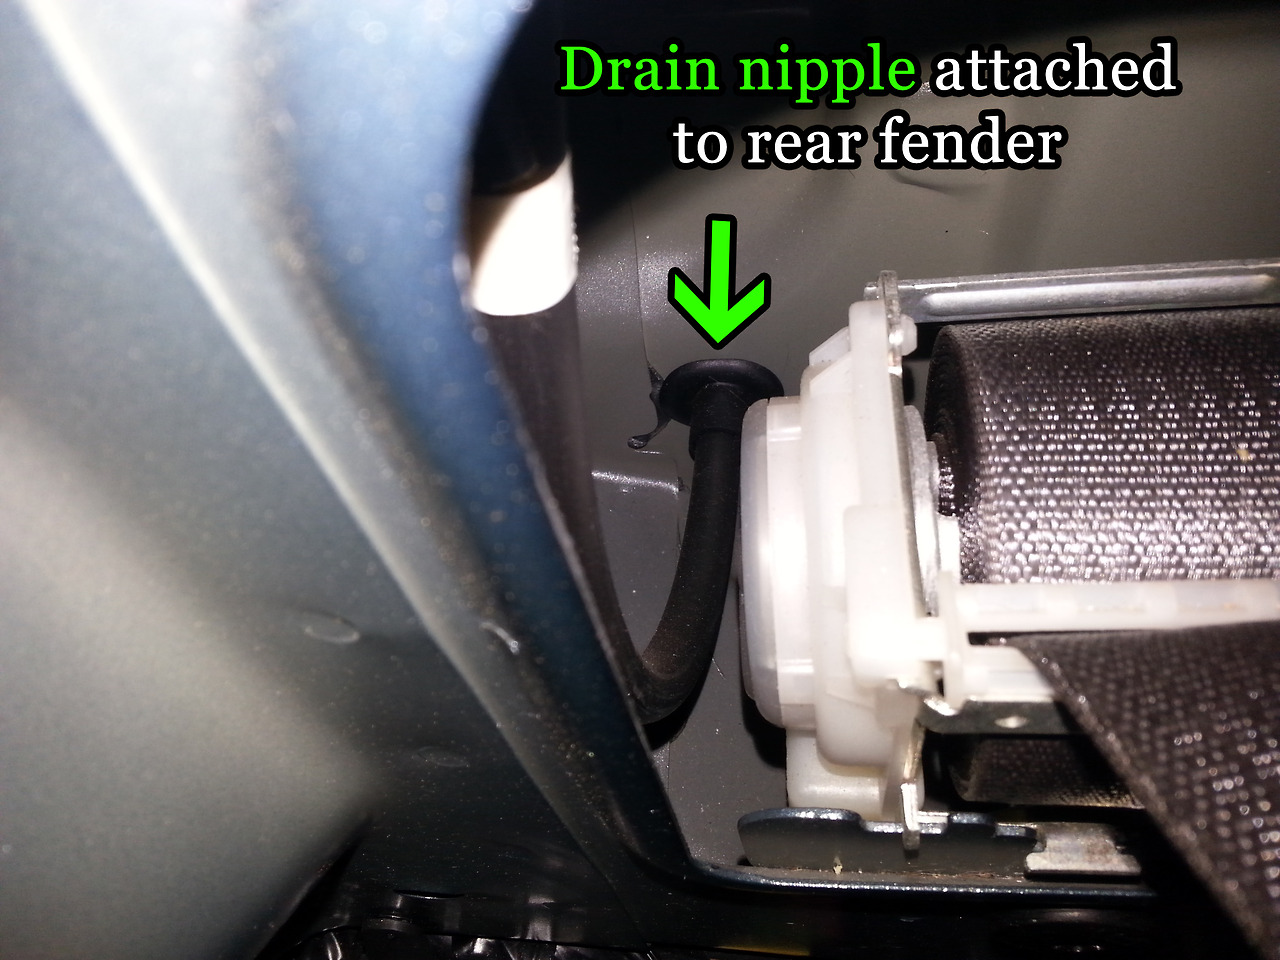
Step 4 - Drain Tube Removal and Cleaning

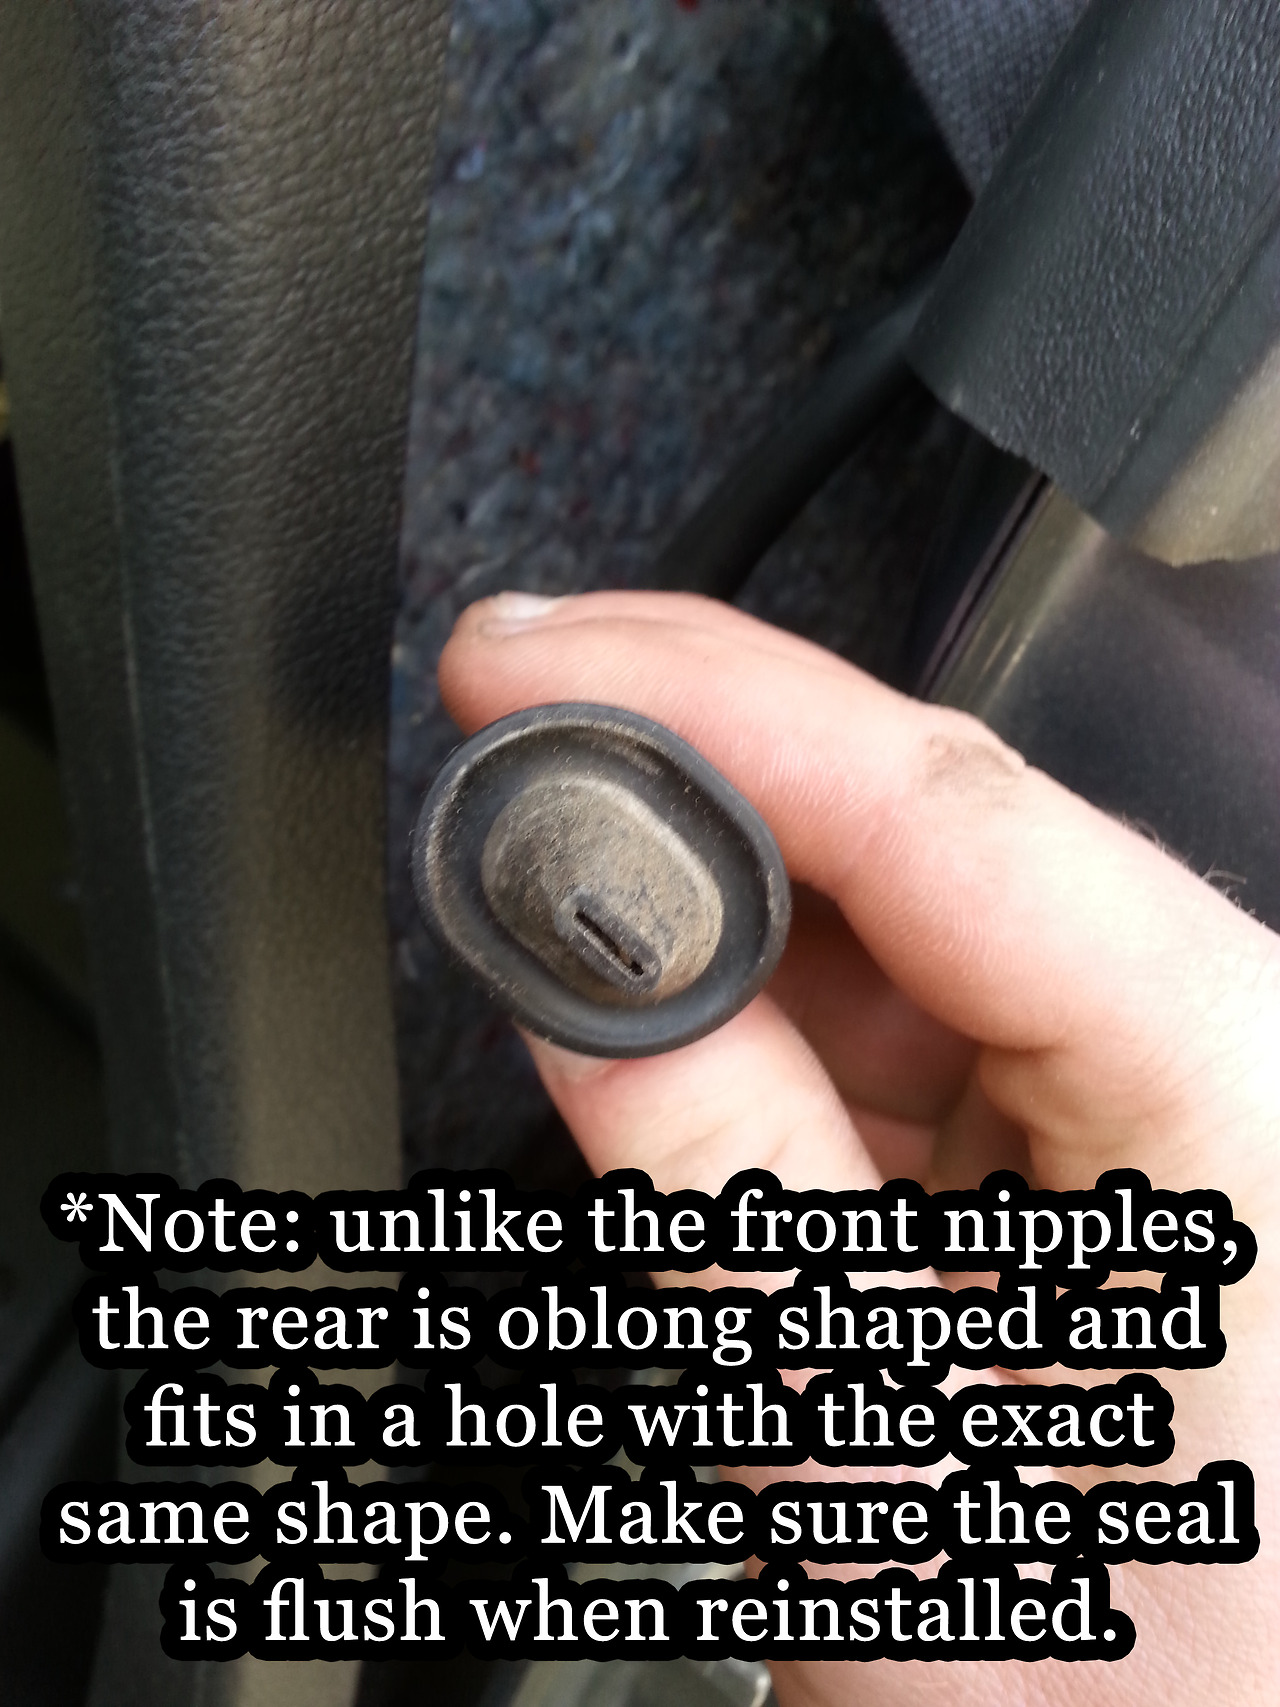
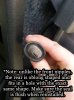
The drain tubes run from the end of the sunroof assembly, down the C pillars, and exit just behind the rear passenger assembly. You can either remove the nipple that attaches to the fender or the entire tube. The nipples are oblong shaped and fit specifically to the exit hole compared to the circular front drain tube nipples. After cleaning the nipple/tube, make sure the seal is flush against the fender when reinstalling.

attachment.php

attachment.php

attachment.php

attachment.php
 

Attachments

  • tumblr_n3n36mrTLe1tnr3dgo9_1280.jpg
    tumblr_n3n36mrTLe1tnr3dgo9_1280.jpg
    457.4 KB · Views: 7,824
  • tumblr_n3n36mrTLe1tnr3dgo10_1280.jpg
    tumblr_n3n36mrTLe1tnr3dgo10_1280.jpg
    565.8 KB · Views: 8,026
  • tumblr_n3n36mrTLe1tnr3dgo6_1280.jpg
    tumblr_n3n36mrTLe1tnr3dgo6_1280.jpg
    354.5 KB · Views: 7,493
  • tumblr_n3n36mrTLe1tnr3dgo7_1280.jpg
    tumblr_n3n36mrTLe1tnr3dgo7_1280.jpg
    376 KB · Views: 8,412
  • tumblr_n3n36mrTLe1tnr3dgo8_1280.jpg
    tumblr_n3n36mrTLe1tnr3dgo8_1280.jpg
    387.3 KB · Views: 10,656
  • tumblr_n3n36mrTLe1tnr3dgo4_1280.jpg
    tumblr_n3n36mrTLe1tnr3dgo4_1280.jpg
    364.3 KB · Views: 13,389
  • tumblr_n3n36mrTLe1tnr3dgo2_1280.jpg
    tumblr_n3n36mrTLe1tnr3dgo2_1280.jpg
    274 KB · Views: 14,648
  • tumblr_n3n36mrTLe1tnr3dgo5_1280.jpg
    tumblr_n3n36mrTLe1tnr3dgo5_1280.jpg
    313.1 KB · Views: 10,646
  • tumblr_n3n36mrTLe1tnr3dgo1_1280.jpg
    tumblr_n3n36mrTLe1tnr3dgo1_1280.jpg
    474.9 KB · Views: 7,400
Last edited:

cbetts

NERD!!!
Messages
3,182
Location
Rancho Palos Verdes, CA
Thanks for the great writeup! I am sure my rear drains are plugged from a mud-whomping adventure I took a few years ago. I just haven't had enough persuasion to drop the headliner yet. I may now attempt this since you did such a fine job documenting the procedure.

Thanks again!
 

cgalpha08

"Like Nothing Else"
Messages
3,585
Location
Indianapolis, IN
Thank you!! I think mine are clogged...seeing as the rear seats seem to sometimes have water on them mysteriously

Sent from my SCH-I545 using Tapatalk
 

08H3

Well-Known Member
Messages
1,315
Location
United States
Rears can be removed and cleaned without dropping the headliner or most of the trim It's a blind, tight fit, but can be done.
 
Last edited:

Panzer07

Well-Known Member
Messages
2,548
Location
Ontario, CA
Great write...I am gonna have to do this since the front drain plugs on my 3 were super clogged...never hurts to check


Sent From Someone Else's iPhone 'Cause I'm Too Broke To Own One.
 

cgalpha08

"Like Nothing Else"
Messages
3,585
Location
Indianapolis, IN
Bump, because i found a puddle of water on the rear floormat this morning. Is the plug accessible from the outside? meaning if i pull the fender liner can i trim it/unclog from the outside?
I really do not want to pull the headliner.
 

chaos254

Well-Known Member
Messages
577
Location
United States
Bump, because i found a puddle of water on the rear floormat this morning. Is the plug accessible from the outside? meaning if i pull the fender liner can i trim it/unclog from the outside?
I really do not want to pull the headliner.
Pull the inside rear panels(the ones below the window in the cargo area). You can easily access the rear drains once these are removed.
 

chaos254

Well-Known Member
Messages
577
Location
United States
I already had my rear seats out. Remove the rear seatbelt, take off the top panel( pull by the window), remove rear sill plate, then remove the bottom panel.
 

Cyouincourt007

Pavement Prince
Messages
542
Location
Miami,Fl
Excellent write up and diy post but.... You might hate me for this but......I did all 4 without removing squat inside except one small panel passenger side front, and outside vehicle at rear passenger side fender and drivers and passengers side rubber part above tire. You can clean the tubes all you want but unless IMHO you address the fact that the drain plugs themselves are faulty and do not let water flow out with some gunk as well then all your doing is getting a clogged toilet with a penny sized drain....pooping, plunging and then cleaning toilet meanwhile ignoring the fact that the next time you take a dump the stuff has nowhere to go. People say well if you clip the back ones to open the exit and do same to front then Your exposing critters to come inside. Guess what a roach or an ant can get it with or without this mod. I had ants in the hummer before i made any of these changes and when addressing the issue I found a little Eco system of critters living under the drenched carpet supplied with fresh water every time it rained. If your toilet has a drain the size of a penny would you just poop and scoop with a cup and clean the toilet repeatedly or would you perhaps slap a 4 inch pipe under it and make sure all that Taco Bell you ate last night could find its way out to somewhere else lol I actually went from seeing ants on the daily to seeing 1 a month.
disclaimer...I am a noob and I'm sure many of you out there know much more than me but all I can say is I got sick and tired of drenched floor mats and water pouring on my head,pants and on my passenger out of the headliner and on star speaker spot until I said enough is enough...I clipped and cleaned out the clogged exits making them larger and allowing water to flow out like its inteded to and haven't had an issue since even with nasty heavy rain down here. Mine may not be the proper technical approach as posted here and you can what if this and that all you want my only point is if you want a way to minimize the problem at the source and get to the root of the problem with less effort then open up them "exit doors"..
 

cgalpha08

"Like Nothing Else"
Messages
3,585
Location
Indianapolis, IN
Excellent write up and diy post but.... You might hate me for this but......I did all 4 without removing squat inside except one small panel passenger side front, and outside vehicle at rear passenger side fender and drivers and passengers side rubber part above tire. You can clean the tubes all you want but unless IMHO you address the fact that the drain plugs themselves are faulty and do not let water flow out with some gunk as well then all your doing is getting a clogged toilet with a penny sized drain....pooping, plunging and then cleaning toilet meanwhile ignoring the fact that the next time you take a dump the stuff has nowhere to go. People say well if you clip the back ones to open the exit and do same to front then Your exposing critters to come inside. Guess what a roach or an ant can get it with or without this mod. I had ants in the hummer before i made any of these changes and when addressing the issue I found a little Eco system of critters living under the drenched carpet supplied with fresh water every time it rained. If your toilet has a drain the size of a penny would you just poop and scoop with a cup and clean the toilet repeatedly or would you perhaps slap a 4 inch pipe under it and make sure all that Taco Bell you ate last night could find its way out to somewhere else lol I actually went from seeing ants on the daily to seeing 1 a month.
disclaimer...I am a noob and I'm sure many of you out there know much more than me but all I can say is I got sick and tired of drenched floor mats and water pouring on my head,pants and on my passenger out of the headliner and on star speaker spot until I said enough is enough...I clipped and cleaned out the clogged exits making them larger and allowing water to flow out like its inteded to and haven't had an issue since even with nasty heavy rain down here. Mine may not be the proper technical approach as posted here and you can what if this and that all you want my only point is if you want a way to minimize the problem at the source and get to the root of the problem with less effort then open up them "exit doors"..

So you're saying you can access the rear drain outlet by removing the fender liners? If so, that would save a boat load of time. Sure itll be harder to cut out the insides like that but it'll save a lot of headache versus removing the interior paneling.
 

Cyouincourt007

Pavement Prince
Messages
542
Location
Miami,Fl
Yes sir. Passenger side rear I removed fender and liner above tire. Was some bolts and clips.
drivers side rear when I started to remove I realized would be pia with gas cap parts etc so I only removed liner above tire and was able to reach in and clip tube.
i don't know if same would work on passenger side rear without removing fender but I think it would. All it took on drivers side rear was a flashlight and some snips once I had liner off. Removing the fender in passenger side was pia so try doing the liner first only and look up in there and look good cause it's hard to spot(well it was night out for me). Front was easy too, need any help let me know.
 

4speedfunk

Well-Known Member
Messages
4,212
Location
Tardville
Two questions on this:

1. Where was the actual clog(s)?
2. You did enlarge the openings, correct?

There is no way in hell I would do all this work and put it back exactly way it was.
 

Cyouincourt007

Pavement Prince
Messages
542
Location
Miami,Fl
Yes just to be clear...thanks 4speed lol me neither. I havent even put back my kick plates or the door guard thingys i didnt even need to take off in the first place sheesh.

the clog was at exit on both front and at both rear. the front ones were discustingly clogged with goop and you couldnt even see light through them. fronts i was able to remove, clear debris(washed under sink) and then cut away the flaps inside of the exit piece leaving a wide open circle for water to exit. (my hands are small enough to reach up in there for the front ones to disconnect from tube remove the rubber exit door and fix it etc.)

the rears...clogged at the exit piece..to be clear i mistyped above...i did not remove the back ones..all i did was clip them leaving a nice circle exit for water to come out...the rears also had goop at that super small exit as seen above in the pics. be careful not to pull off the rear ones cause then reconnecting will be pia.

for rears simply remove those flaps above tires and use a flashlight to locate...reach up in there and clip it back leaving a perfect circle. no more issue for front or back (knock on wood) and i did not even mess with the tubes at all.

ill locate some pics i have on my laptop and post later.

front ones i did observe some goup in the tube when i removed the rubber piece but it was all concentrated at the exit point. i wish i knew how easy this was before i would of done it long ago...instead of all those days with a wet floor and water pouring down my head.
 
Top