• Welcome to H4O! For a reduced ad experience, please login or register with the forum.

Great Danes Hummer H3 Build

GreatDaneHummer

Well-Known Member
Messages
994
Location
Chicago
I guess if I am going to take the time to share my adventure with owning a Hummer H3 then I have to take you back to the nightmare that started it all. I am putting together all my receipts and proof of the craziness I have gone through because as they say, no pictures = didn't happen.
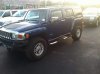
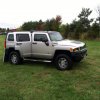
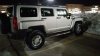
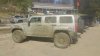
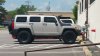
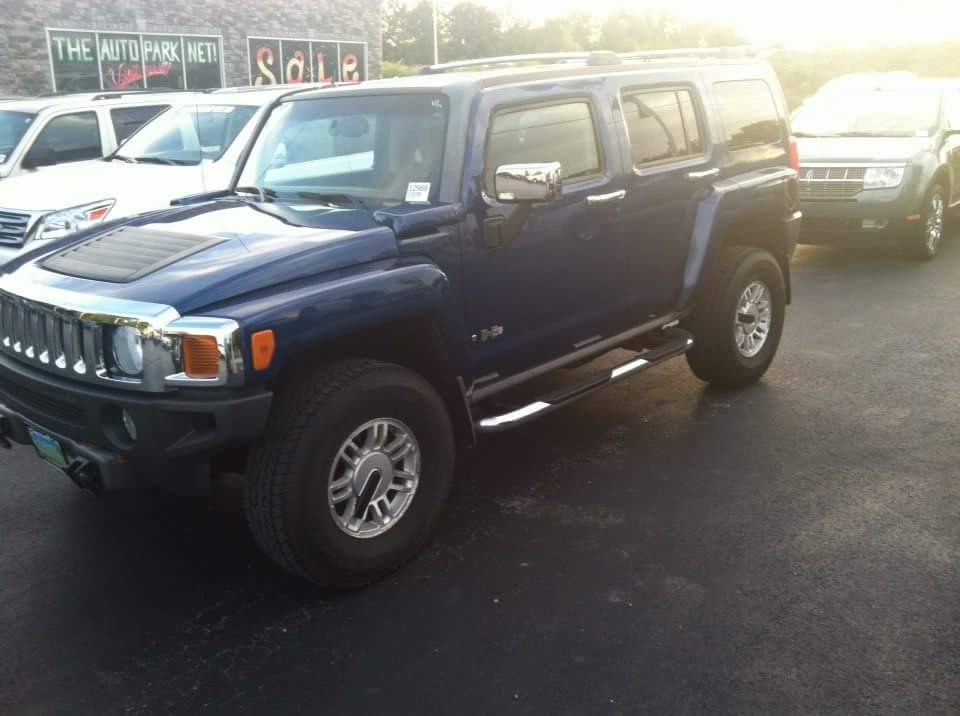
A few requirements that my fiance and I had when shopping for our first vehicle together was room on the inside for our 158 lbs English Great Dane dog and still fit 4 adults. No I don't mean 4 midget size adult but real human beings. Working only 2 miles away from our downtown apartment I really didn't care about gas mileage at all but I did care about over all size due to having size limitations in our building. No over sized vehicles counted out most full size trucks and suv's also the 6'6" max height in the parking garage posed a pain in my rear too. With all that said our first trip into owning a Hummer product was a 2006 Hummer H3 in blue. I found it in Indiana just over the boarder so one bright sunny afternoon we drove down and purchased it.
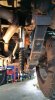
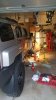
Now comes the nightmare; on my way back home the check engine light goes on. At this point I am freaking out. I call the dealer I bought it from and they say take it to my local GM dealer since I have the extended warranty. I will make a long story short here but after 3 weeks worth of arguing between the dealer, warranty company and original dealer that sold the truck GM itself stepped in and flexed some power to get me some help. The original dealer took the vehicle back paid me for my out of pocket expenses and I was back to square one. Blue Hummer H3 picture below. My next posting will be when things turned around. (The bill at GM dealer was over $20,000 worth of new drive train.)
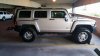
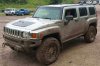
attachment.php
 

Attachments

  • 2006 Blue H3.jpg
    2006 Blue H3.jpg
    49.5 KB · Views: 5,268

GreatDaneHummer

Well-Known Member
Messages
994
Location
Chicago
Being determined that an H3 is the perfect vehicle for our family I decided if you want to get something nice you have to pay a little more for it. After looking for a few days we found a 2007 Hummer H3 in Silver with only 42,000 miles on it owned locally just northwest of Chicago. Martin Chevy in Crystal Lake IL, really took care of us after we told them about our first time trying to buy an H3. They pulled it into the shop and changed all the fluids (Axles, Trans, Coolant, Oil and Transfer Case) and showed me all the under body condition etc. Everything looked great so home it came. Everything worked great but I knew the stock tires had to go.


attachment.php
 

Attachments

  • Silver H3 2007.jpg
    Silver H3 2007.jpg
    105 KB · Views: 4,834

GreatDaneHummer

Well-Known Member
Messages
994
Location
Chicago
Next up are new cross drilled and slotted racing rotors with ceramic pads. I found out later how bad cross drilled rotors are for off road. They hold mud in them and are horrible to get cleaned out.

attachment.php
 

Attachments

  • New Breaks.jpg
    New Breaks.jpg
    99 KB · Views: 4,124

GreatDaneHummer

Well-Known Member
Messages
994
Location
Chicago
Installed new Procomp MX6 Adjustable shocks front and rear. After 35,000 plus miles on them on and off road I would say they are pretty good for the money but I would like to try going a little more drastic next time with new shock mounts and maybe a coilover removing the torsion bars. The more I work on this truck the more confident I become in learning new things and taking risks. CJ at Thor Parts has been very helpful in guiding me along this crazy trip.

attachment.php
 

Attachments

  • Procomp shocks.jpg
    Procomp shocks.jpg
    62.6 KB · Views: 4,067

GreatDaneHummer

Well-Known Member
Messages
994
Location
Chicago
I have heard mixed opinions on torsion bar lifts sold but I went ahead and changed the keys with ones by Procomp and lifted the front end up.

attachment.php
 

Attachments

  • Procomp lift.jpg
    Procomp lift.jpg
    50.9 KB · Views: 5,967

GreatDaneHummer

Well-Known Member
Messages
994
Location
Chicago
Not liking the rear sitting level with the front I added Schwarttzy's 2" lift shackles for the rear. I will have to find a photo of them but they are built like a tank.
 

GreatDaneHummer

Well-Known Member
Messages
994
Location
Chicago
Before you say anything, yes this is a borrowed photo because I couldn't find one of mine but the craftsmanship really needs to be shown to be appreciated. This is Scorpworks transfer case cross member and bushing replacement. It is well worth the money and my transfer case has been movement free. It was installed by a local shop here in Chicago.

attachment.php
 

Attachments

  • Scorpion works.jpg
    Scorpion works.jpg
    57.6 KB · Views: 6,714

GreatDaneHummer

Well-Known Member
Messages
994
Location
Chicago
So a few thoughts before we move on; although most of us can agree that Interco makes pretty good off road tires they have a few very real draw backs, bad road handling characteristics and due to the soft rubber they use for off road performance they wear crazy fast. I was also not that impressed with their deep mud abilities; never really cleaning themselves out well even with wheel spin. Being 33" Irok ND's I found another issue.... being 33". Without the ability to do the Rancho lift kit due to the 6'6" max clearance in my building I had no choice but to move to a 35" tire to get more ground clearance. Below is a good picture after running in only 5" of mud... notice how the tires are just caked with mud never letting go.


attachment.php
 

Attachments

  • irok tires-min2 (1) (1)2__1465237197_96.95.83.60.jpg
    irok tires-min2 (1) (1)2__1465237197_96.95.83.60.jpg
    18.2 KB · Views: 4,126

GreatDaneHummer

Well-Known Member
Messages
994
Location
Chicago
More power needed so I did a custom exhaust using an MBRP resonator and Flowmaster muffler. Sound is pleasant without being over aggressive. The Flowmaster is much smaller than the factory muffler also raising up the rear zone so the bumper hits down on rocks before the muffler does.


attachment.php
 

Attachments

  • Custom exhaust (1)__1465238383_96.95.83.60.jpg
    Custom exhaust (1)__1465238383_96.95.83.60.jpg
    27.4 KB · Views: 3,894

GreatDaneHummer

Well-Known Member
Messages
994
Location
Chicago
After doing a lot of reading and asking around I came up with the 315/75R16 Mickey Thompson Baja Claw TTC Radial. I have to say that after 20k miles on them they are very good. Great road handling along with out of this world grip off road either in deep 20" mud or river rock crawling. They are rated at 20.5/32 tread depth and after 20k miles I am at 16-17/32 so should be able to get around 35-40k miles on them before scrap. Most people run their tires longer than I like to.

attachment.php
 

Attachments

  • Baja Claw TTC 1.jpg
    Baja Claw TTC 1.jpg
    487.4 KB · Views: 4,082

woodwardsh3

Well-Known Member
Messages
501
Location
Oakland Co. Mi.
Before you say anything, yes this is a borrowed photo because I couldn't find one of mine but the craftsmanship really needs to be shown to be appreciated. This is Scorpworks transfer case cross member and bushing replacement. It is well worth the money and my transfer case has been movement free. It was installed by a local shop here in Chicago.

attachment.php
You could always tac on a sheet metal cover / skid to protect it. And grind it off if needed.
 

GreatDaneHummer

Well-Known Member
Messages
994
Location
Chicago
For a long time I had lots of trouble trying to get my camber correct during an alignment. Close to $500 in alignments with no real success; I could never raise my front end up as high as most people do with their torsion bars without camber being really out. Finally I decided to change out my upper control arms, camber bolts and plates to see if this would take care of the issue. There is a long story in here that is missing but in the end I found that the camber plate was welded to the frame. My dad thank God, gave me a hand and we cut out the entire camber bolt and plate out of the front passenger side. Photo below shows the new reinforced slot created with two backer plates welded in. I am pretty handy with working on vehicles but this was over my head. Welding it wrong into place could have caused it to never have a quality alignment. At this point I went all out and replaced everything; lower ball joints, sway bar linkage, outer wheel bearing hubs and the entire steering rack. Now a few have heard about my mess with the steering rack so below is a photo of it installed. It is a modified 2500 GM rack. No I did not do the work on it, I had a shop called Breaks for Less in Chicago do it. This was not on purpose but an ordering mistake I made.

** working on photos... have to shrink them all down.

attachment.php

attachment.php
 

Attachments

  • 20160319_194450 hole.jpg
    20160319_194450 hole.jpg
    268 KB · Views: 3,816
  • 20160319_171611 dad welding.jpg
    20160319_171611 dad welding.jpg
    548.6 KB · Views: 3,786
Last edited:

GreatDaneHummer

Well-Known Member
Messages
994
Location
Chicago
Now if you look at how the Irok Nd's did not clean out now look at these Baja Claws after wheeling in far worse 20" worth of mud. They are cleaned out and ready to bit again.


attachment.php
 

Attachments

  • Mickey deep mud__1465244177_96.95.83.60.jpg
    Mickey deep mud__1465244177_96.95.83.60.jpg
    20.6 KB · Views: 2,297

GreatDaneHummer

Well-Known Member
Messages
994
Location
Chicago
And this is my truck today 6/6/16. Installed the ARB snorkel after getting it Line X'd. Replaced the spark plugs, coil packs, battery and changed all fluids in the last 2 weeks.

attachment.php
 

Attachments

  • 20160606_114941 now.jpg
    20160606_114941 now.jpg
    548.6 KB · Views: 2,667

atvspeed4

Well-Known Member
Messages
1,173
Location
massachusetts
For a long time I had lots of trouble trying to get my camber correct during an alignment. Close to $500 in alignments with no real success; I could never raise my front end up as high as most people do with their torsion bars without camber being really out. Finally I decided to change out my upper control arms, camber bolts and plates to see if this would take care of the issue. There is a long story in here that is missing but in the end I found that the camber plate was welded to the frame. My dad thank God, gave me a hand and we cut out the entire camber bolt and plate out of the front passenger side. Photo below shows the new reinforced slot created with two backer plates welded in. I am pretty handy with working on vehicles but this was over my head. Welding it wrong into place could have caused it to never have a quality alignment. At this point I went all out and replaced everything; lower ball joints, sway bar linkage, outer wheel bearing hubs and the entire steering rack. Now a few have heard about my mess with the steering rack so below is a photo of it installed. It is a modified 2500 GM rack. No I did not do the work on it, I had a shop called Breaks for Less in Chicago do it. This was not on purpose but an ordering mistake I made.

attachment.php
attachment.php

attachment.php

attachment.php
Pics don't seem to be working
 

GreatDaneHummer

Well-Known Member
Messages
994
Location
Chicago
I would actually like to try the Pitbull Rocker Radials next. 35/12.5R17 .... maybe a second set or something. I love all tires.
 

GreatDaneHummer

Well-Known Member
Messages
994
Location
Chicago
Good pics on the difference on the tires. Looking to upgrade soon

I would for sure recommend the Mickey Thompson Baja Claw TTC Radials for your next set of tires. If you have an Alpha and a little money to burn then go with the Pitbull Rocker Radials but it also depends on what your normally wheeling in. Being in the midwest its a lot of mud so Baja Claws are amazing. If I got to play with the Rubicon trail then Pitbulls would be on.
 
Top